An essential component of developing a new mobile app is creating the user onboarding flow, which includes the landing page, login and registration pages, etc. One of FireBase's major features, authentication, is very handy in navigating users through these opening screens of a mobile app.
Notably, Firebase handles everything you need to handle on the server side (user management, OAuth, security, password storage, etc.), so you won't need to worry about the underlying server codes. You may protect your app's data and restrict access to only its users with the help of FireBase Security Rules.
Firebase offers a variety of authentication options, including Email/Password, Google Sign-In, Facebook Sign-In, and Sign in with Apple, to name a few.
We will go through implementing Email/ Password Authentication with a SCADE app in this first FireBase SCADE tutorial.
Getting Started
To get started, click on this link to download our starter SCADE Project, and build and run the app in any simulator of your choice.
You can also follow this link to download the SCADE IDE if you haven't already done so.
The following is the structure breakdown of our starter project:
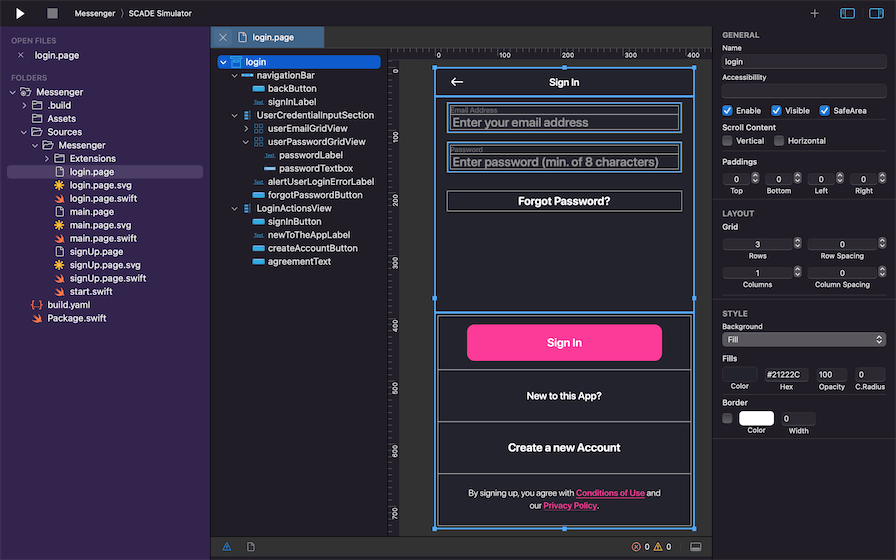
Sources – this folder houses the login, main, and signUp Page Builders that hold the login, landing page, and signUp UI screens respectively, along with their corresponding page.swift and page.svg files.
Most importantly, the Sources folder also contains the start.swift file that represent the runtime entry point of any SCADE project. If you open this file, you would notice we set the root view controller of the current window to be the loginPage. In other words, this simply means the loginPage becomes the first screen we see anytime our app is run.
build.yaml - this file sets the path to both Android and iOS specific settings of our app project. It includes the bundle id that we will require later on in this tutorial for FireBase Integration.
Package.swift - This Package manifest file will house the FireBase dependencies we'll be needing later on for this tutorial.
Note: The navigation into each screen is done programmatically on each page's page.swift file. Also, these screens are more or less currently static as we are yet to add the FireBase support.
Diving into FireBase Integration
Go to Firebase Console using your Gmail address and create a new project (name it as you wish). Once you’ve created a new Firebase project, go to its Firebase Dashboard, by simply clicking on it in Firebase. You ought to arrive at this screen:
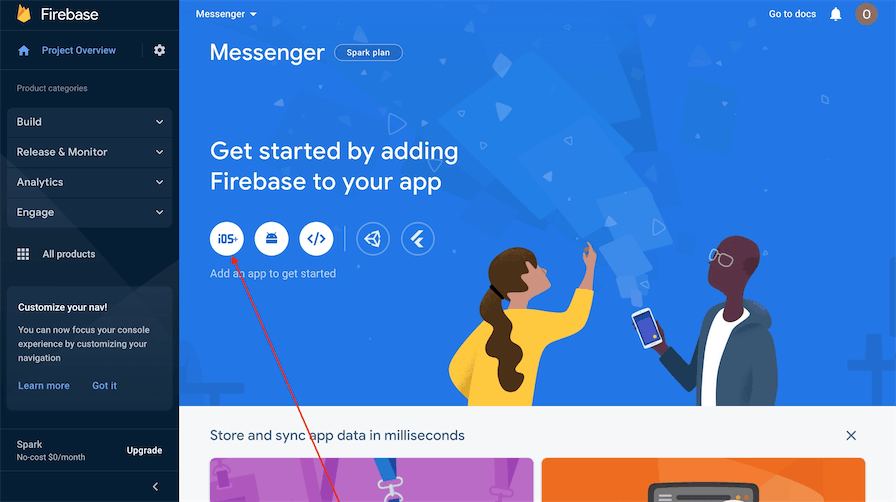
Click on the first button below the text "Get started by adding Firebase to your app" to add a new iOS app to your project. Next, go to the iOS section of your project's
build.yamlfile in SCADE and copy thebundle Idand paste it as the input value of theApple bundle IDto register your app. If you’d prefer to use your ownbundle ID, make sure you update the Bundle Identifier of your project in SCADE: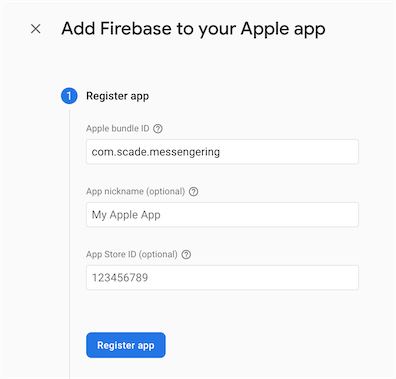
After clicking on the Register-app button, FireBase will generate a
GoogleService-Info.plistfile, which you need to download and add to the Sources folder of your project in SCADE:
The Google Firebase iOS SDKs are a collection of libraries that are primarily used to integrate FireBase into mobile app projects. These Swift SDKs serve as bridges between your SCADE apps and the FireBase backend, to put it simply.
To install FireBase using SPM, open your project's
Package.swiftfile and add the FireBase package details under dependencies. Also, add Firebase Auth as the product target under the targets path: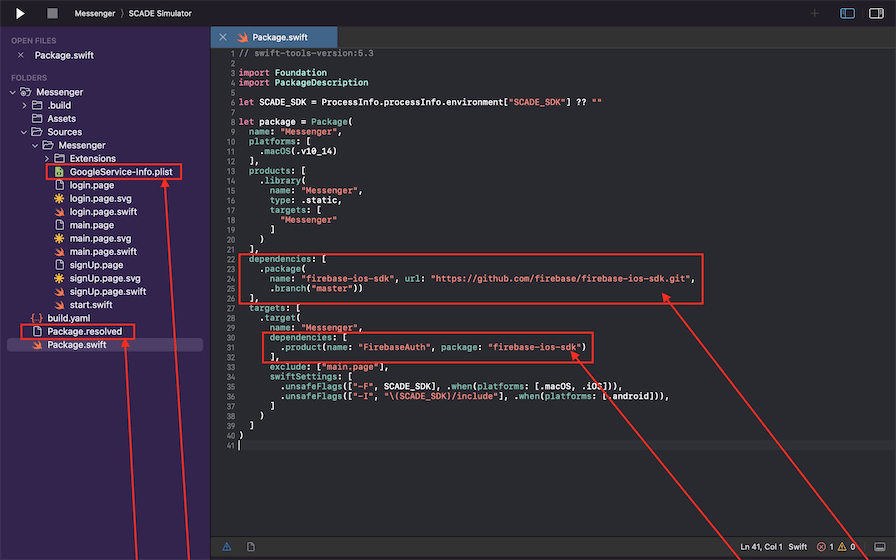
Next, we
import FireBaseto our already establishedstart.swiftfile and add an initializer inFirebaseApp.configure()to theonFinishLaunchingmethod that would help in configuring FireBase for us: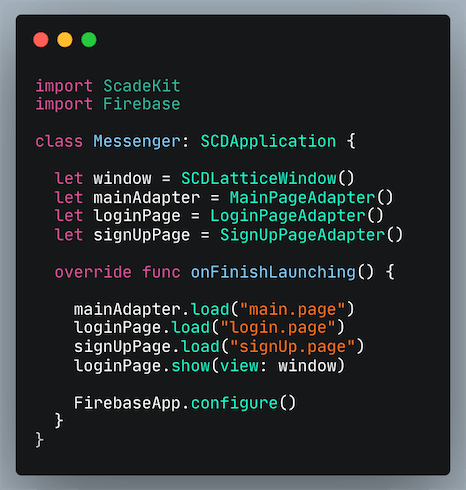
FireBase Authentication
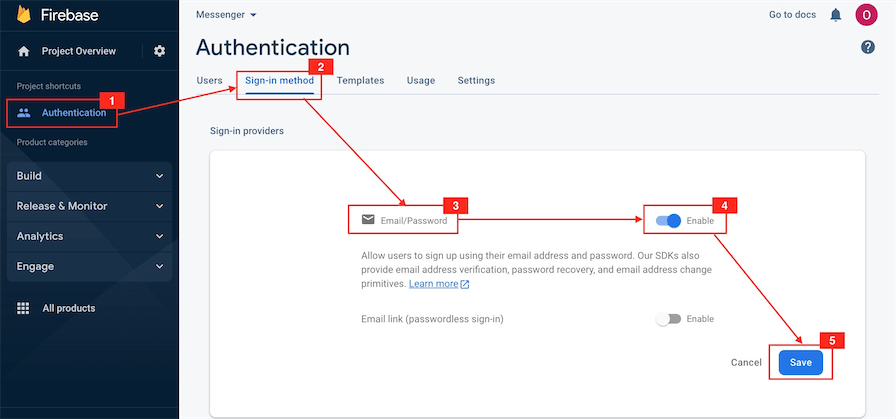
In the sidebar, from the Build section drop-down menu, click on Authentication and navigate to the Sign-In Method tab to select Email/Password as your provider. Next, toggle the option that says "Allow users to sign up using their email address and password..." on the next screen before finally clicking on the "Save" button to enable selection:
Registering a new User to FireBase Server
The next step is to connect our SignUp screen to FireBase as the starter project only has the UI part done.
For this project, the signUp screen handles the whole registration process. We have already created a signUpButtonTapped method inside the signUp.page.swift file to trigger the signUpButton when pressed by a user. But only the logic that binds its textboxes was created for the starter project.
The textboxes logic is checking that both the e-mail and password fields are not empty and that the password is at least 8 characters long. And if all of the above is not met, a text indicating that all details must be entered correctly is shown below the password textbox.
We needed to import FirebaseAuth to have access to the Auth.auth().createUser method that helps in creating and securing authenticating users to FireBase and also error handling just to mention a few.
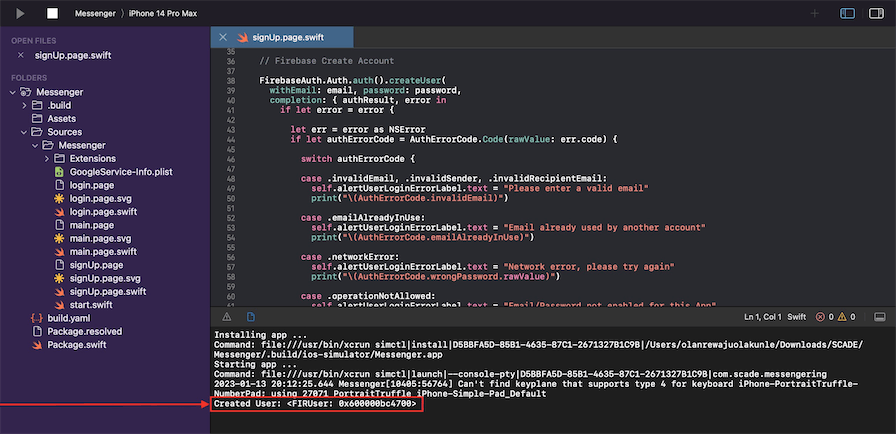
Below the textboxes logic, inside the signUpButtonTapped method, we added the Auth.auth().createUser method to collect both the email and password values needed for creating a new user account in FireBase. We used its completion handler to determine the status of the operation by retrieving the result if successful and printing the newly created user information to the console or by returning an error message depending on the type of auth error received to the console if it fails:

Going by the above method, you sure know that you have just created a new user on your FireBase project when an instance of the newly created user is printed on the console and the clicked button navigates you to the main.page screen:
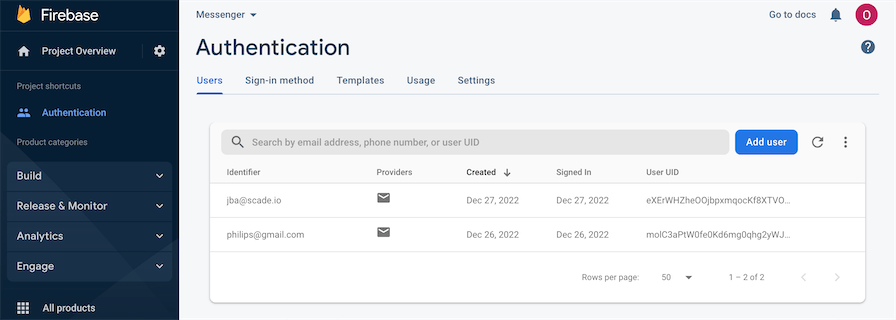
To see the registration details of the new user that just got created, navigate to the Users tab of the Authentication section of your FireBase Console:
Logging in an existing User on FireBase
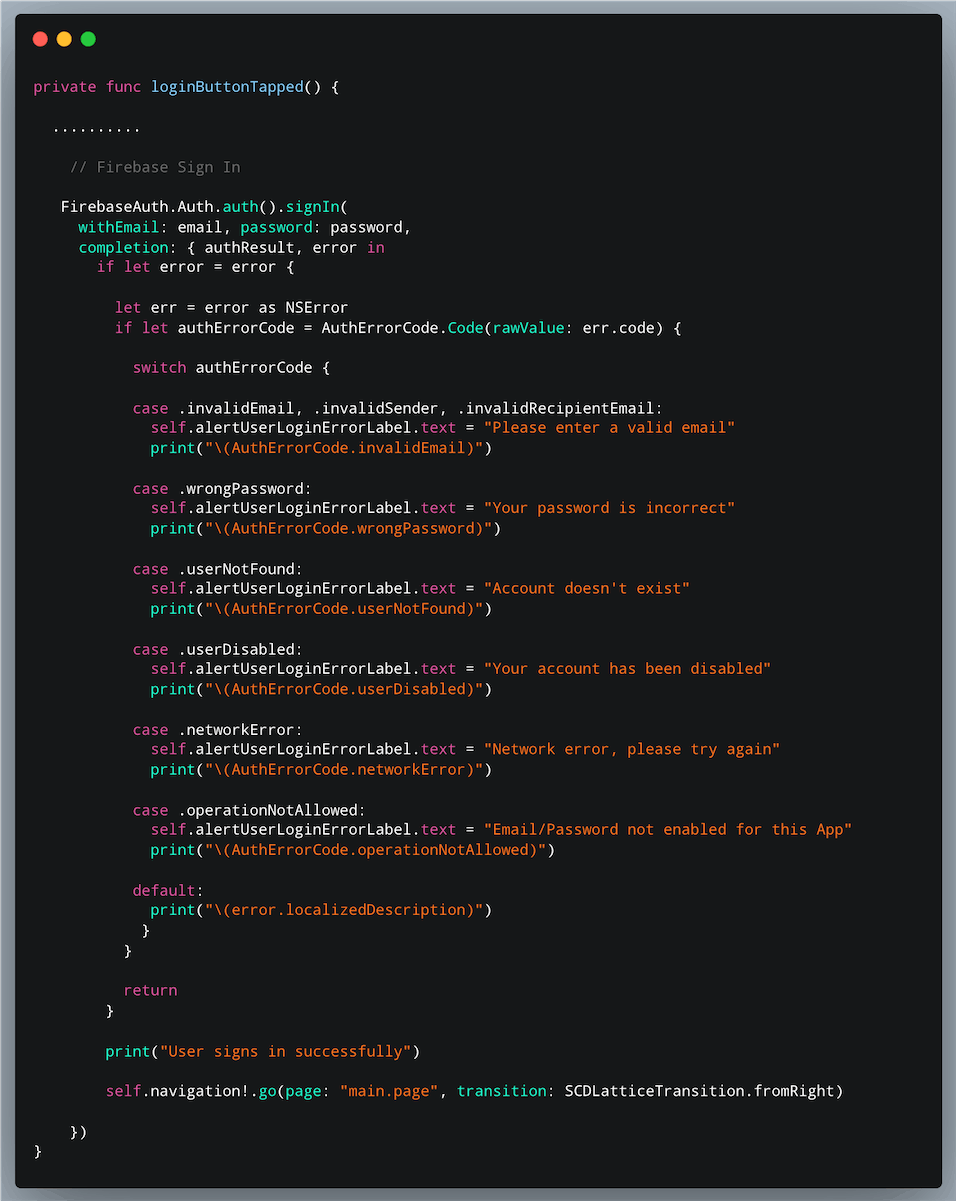
Now that the mechanism for creating new users is successfully accomplished, the next thing is to head to the login.page.swift file and add a Firebase Auth method inside the already created loginButtonTapped method that is responsible for allowing users to sign into the app with their credentials.
Similar to the signUpButtonTapped method, the loginButtonTapped method only currently contains the logic that controls its textboxes as at the time the starter project was created. The textboxes logic is the same as the one for the signUpButtonTapped method.
Again, we are leveraging Firebase Auth SDK to communicate with the Firebase instance and make a login request via the provided email and passowrd values by users.
The completion handler for the Auth.auth().signIn call returns an error that describes why the authentication fails which is depended on the type of auth error code received (e.g. AuthErrorCode.invalidEmail).
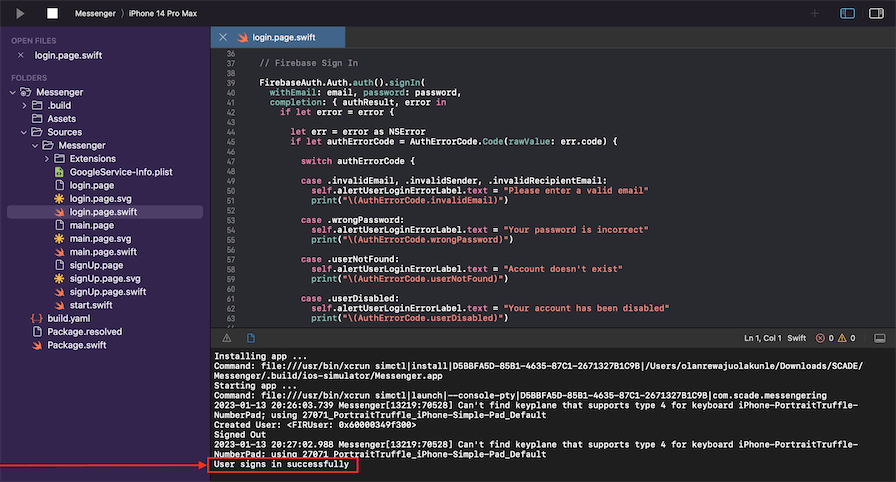
If there are no errors, a print statement indicating a successful sign-in of the user is sent to the terminal before finally navigating the signed-in user to the main.page screen.
Note that the login.page.swift file manages the login screen. Locate the loginButtonTapped method and add the following lines of code below the textboxes logic:
Signing Out a User on FireBase
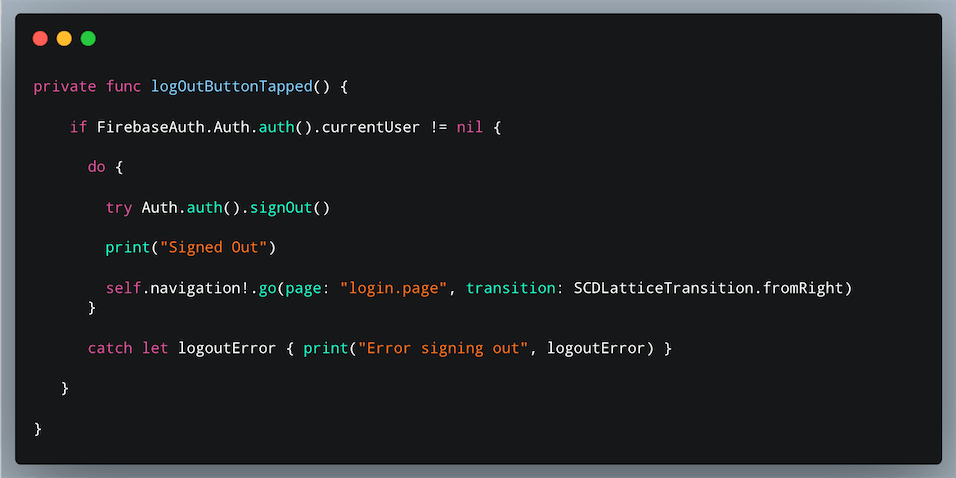
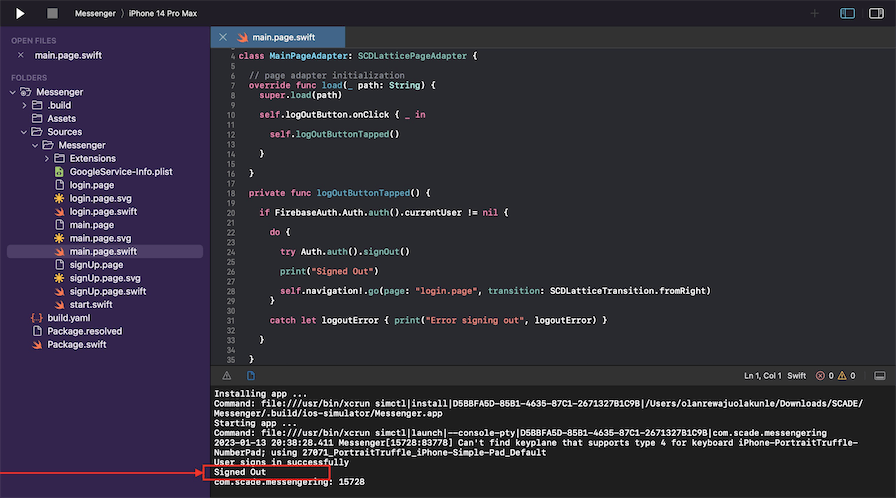
The logOutButtonTapped method clears the current user information and token locally while printing to the terminal a "Sign Out" statement and navigating the signed-out user back to the login page if successful. The method also throws an error if the sign-out process is not successful.
Note, it's good practice to check and make the currentUser property nil to always have users signed out successfully before calling the FireBase sign-out method responsible for signing out authentication:
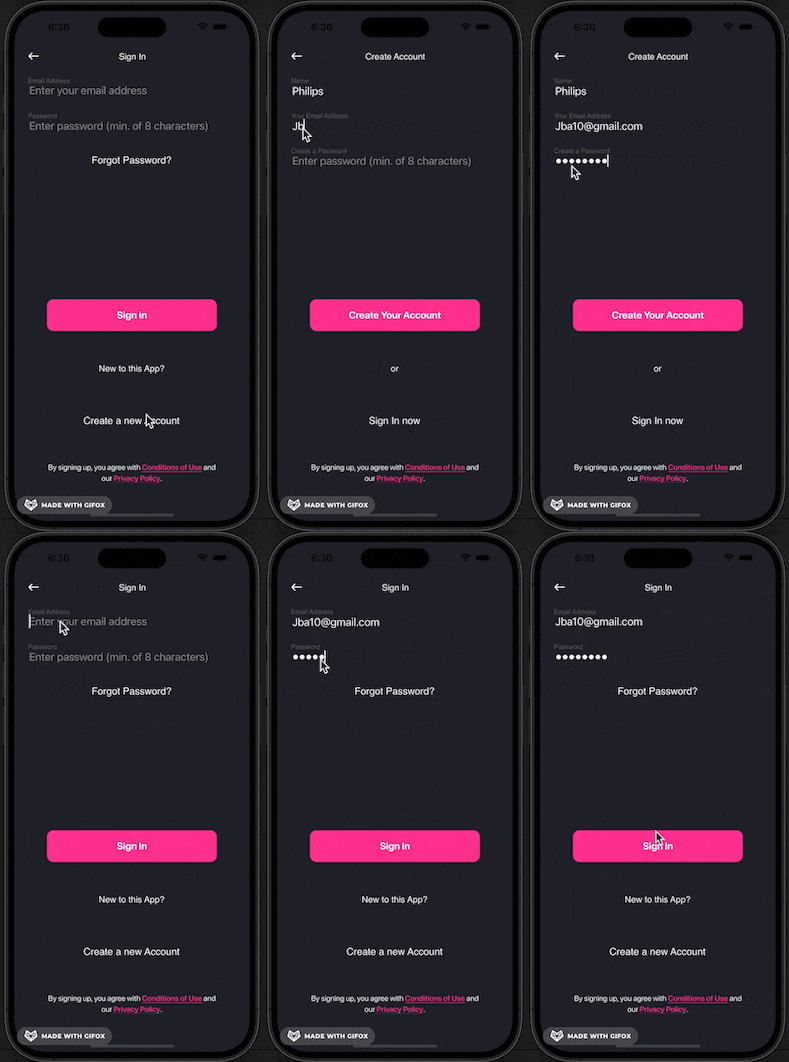
Final Result:
Conclusion
This FireBase tutorial shows a step-by-step way of integrating Firebase Auth into SCADE projects. We made use of some of the Firebase Auth methods to implement the sign-up, sign-in, and sign-out features for our app project for this tutorial.
The Firebase integration in this tutorial is basic, so it will need many more features to build a complete standard mobile app.
The complete source code for this tutorial is available on GitHub: Messenger.
